

The "Why" Behind This Blog
I wasn't going to give you this as a free blog.
In fact, this blog was originally supposed to be explaining my thought processes behind the 12-week training program I'm releasing SOON.
In this upcoming program (more details at the bottom of the blog), you'll have a choice between an Upper/Lower functional bodybuilding program -OR- a full body strength/fat loss program, plus access to me, a private community, and much more.
But, mid-editing I realized...
"This is everything any coach insecure about the programs they're prescribing their clients (or themselves) needs to know about programming."
This literally takes you through the process of designing training months, weeks, and days for your clients.
And because I like giving & helping out others who are struggling to get clients or themselves results like I once was, here we are.
So with that said, I give you Program Design 101.
Enjoy.
The 3 Fundamental Principles Your Training (Or A Client’s) Should Always Be Built Around
1. Your training program needs to be fun.
There are lots of solid, evidence-based programs out there that forget this all-important aspect. When you’re having fun with your training, you’re more motivated, you push harder in the gym, you get better results, and most importantly - you build a lifelong habit.
2. Your training program needs to be backed by science & goal-specific.
Know what’s great for motivation?
Actually making progress.
Many training programs are fun and entertaining for a few weeks… until you realize you’re not making any progress. This means nothing in these programs are random. We’re implementing different periodization strategies, progressions, and phases to not only make your training fun and engaging, but also change your physique dramatically.
3. Your training program needs to help you look better, feel better, AND move better.
This means we’re not force-feeding movements that create pain, we’re taking the time to mobilize & prime your body before training, you’re training all the foundational movement patterns in their correct ratios, and we’re NOT neglecting your aerobic system.
Unfortunately, there’s a huge lack of training programs & information out there on how to create programs that meet all 3 of these principles.
Which is exactly why I've been building this program, and am giving away a stupid amount of education in this blog.
I’ve been there - both as the trainee & the trainer - confused as to why my programs weren’t working for myself and my clients.
I built you this program and wrote this blog so you don’t ever have to feel like I did. You’ll be armed with both the knowledge and the actual training program you need to create the leanest, strongest version of yourself you’ve ever seen.
Never again will you have to wonder if you’re “doing the right thing” in the gym - for yourself or a client.
Designing A Training Month (A Mesocycle)
Because I know many of you reading this are coaches yourselves, I want to start by explaining the why behind the program you’ll be following. I want this to be an educational experience to not only help you create your best body ever, but also help get your clients better, pain-free results.
To build a great program, we start by looking at training from the mesocycle perspective.
Mesocycle is a term often used within training program periodization. In this case, it refers to a month or a "phase" within your training program.
Both the Upper/Lower functional bodybuilding program and the full body strength/fat loss program program have three mesocycles.
While it’s smart to plan from a macrocycle perspective (over the course of multiple months - years) for competitive powerlifters, athletes, and the like - for most general population trainees, we really have no idea what the future holds and how long we’ll be working together.
So for most coaches that work with the general population, it makes the most sense to focus on creating well-structured mesocycles that your clients (or yourself) can easily build off of in the future, without a rigid yearly plan.
Basically, we’re looking at the desired outcome from each month or phase of training first, and reverse engineering from there, all the way to what each training day should look like.
Now, I’m assuming you're like most of my online clients - your goals are to build functional strength & muscle while staying lean.
To accomplish this, we know we’ll need push intensity and/or volume across the course of the mesocycle. But we also need to make sure we’re managing fatigue properly, to allow recovery & adaptation to the increasing training stimulus. This leaves you STRONGER at the end of the mesocycle, instead of under-recovered and beat up.
Essentially, designing a smart mesocycle starts by determining your progressions for volume, intensity, and frequency across the phase.
To better understand, let’s break down a few of the progressions built into this program.
Using Reps In Reserve
To implement the progressions in this program properly, and really create your best body ever, it’s essential that you understand a concept called Reps In Reserve (RIR).
Reps in reserve gauges how many reps you have in the tank at the end of a set. This is the tool we’ll be using to make sure you’re using the appropriate amount of effort (neither too much or too little) to keep progressing all 12 weeks of this program.
The beauty of using reps in reserve is, it makes your program much more individualized to how you’re feeling on a daily basis.
If you’re low on sleep, under-recovered, or experiencing significant life-stress, an exercise will feel harder. Rather than grind away at (currently) unsafe weights, reps in reserve naturally regresses and progresses intensity, depending on how you’re feeling.
Since I’m not there with you in the gym to judge the appropriate intensity for you to train at, this helps us auto-regulate your training and optimize your results.
To Gauge Reps In Reserve - Ask yourself at the end of a set: “How many more reps could I have squeezed out if I absolutely had to?” Your answer is your “Reps In Reserve” (RIR), or how many reps you feel you had left before failure.

Utilizing reps in reserve properly ensures your training is providing an effective stimulus for growth.
See, the closer you take a set to failure, the more muscle fibers you recruit and fatigue. It’s thought the last few reps of a set are by far the ones you get the most out of, because they do the most to disrupt homeostasis and spark new muscle growth. (This is the concept of "effective reps".)
We know that if we push the intensity too far (0 RIR/lots of sets to failure), we’ll create too much stress to recover from. We also know that if your RIR is too high (probably 5+), you won’t get much out of your set.
So it’s smart to spend the majority of your time training around an 1-3 RIR, which is exactly what you’ll be doing in this program.
The Progressions
Tying this all together - We’re manipulating your training volume and intensity through weekly variations in RIR, sets, reps, or a combination of the three factors.
For example, below you’ll be decreasing RIR weekly AND adding a rep. At the very least, you’ll add a rep each week (and potentially weight).
This is from Weeks 1, 2, and 3 (respectively) of the Upper/Lower program ↴


Here, we’re increasing volume by manipulating sets. RIR stays the same, but volume still increases weekly:

There are lots of progressions like this built into the programs, but you get the idea.
Your strength movements will follow a set progression like shown above. We’ll push volume via sets, weight, and RIR for 3 weeks. We’ll then drop volume for a week during your deload - this is important, as we allow your body to fully recover from the last few weeks of pushing and adapt/grow! If we just linearly increased volume and intensity every week of this program, you would regress.
From here, you’ll be able to start the progressions over in the next phase/mesocycle, but with a heavier weight than the previous. (E.g. mesocycle 1 you could deadlift 3x5 @225 with 1 RIR. mesocycle 2 you find you can deadlift 3x5 @235 with 1 RIR.) This way, we’re also increasing the total volume you lift as the mesocycles go on.
So by the end of mesocycle 3, volume will be much higher than mesocycle 1, and you’ll be much stronger with more lean muscle.
Energy Systems
Progressing across the course of a mesocycle also means considering your cardio progressions.
No matter if you choose the 3x/week full body split or the 4x/week upper/lower split, you'll have two optional cardio days built in. I would highly recommend you do them, regardless if your goal is getting leaner, or building muscle.
The cardio I’ve programmed won’t “steal your gainz”... it’ll help them.
Really. Let me explain.
Your energy for different activities in the gym comes from three main "energy systems":
1. Anaerobic-Alactic System - Primarily fuels the first ~15 seconds of exercise
2. Anaerobic-Lactic System - Primarily fuels the first ~60 seconds of exercise
3. Aerobic System - Primarily fuels from 60-90 seconds on exercise forward

Now, when you're lifting weights, you're primarily using the first two "anaerobic" energy systems.
You're probably NOT doing much training to build your aerobic system, which is a mistake.
To quote Joel Jamison:
“Your aerobic system drives restoration of homeostasis within the cellular environment following anaerobic energy production.”
Basically, your aerobic system is what helps you recover from anaerobic efforts (lifting).
A higher level of aerobic fitness (to an extent) will translate to faster recovery and likely heavier weight lifted (due to decreased fatigue) between sets.
Secondly, you need to consider your autonomic nervous system (ANS).
Your ANS handles the processes in your body that don't require conscious control. Things like breathing, blood flow, digestion, etc.
The ANS has two main branches:
1. The Sympathetic Nervous System (SNS) - a.k.a. Fight or Flight Mode
2. The Parasympathetic Nervous System (PNS) - a.k.a Rest and Digest Mode
Your ANS is always activated, and is in either a sympathetic or parasympathetic state.
When you're in a sympathetic state - You’re in “fight-or-flight mode”. You’re sensing some eminent danger or threat. To get ready to fight, better perform in the gym, or even run away, adrenaline and cortisol are released, and blood flow to the major muscle groups increases.
Your body shuts down or slows many processes you don’t need to survive in the short-term (digestion, hormone production, etc.) This is rarely caused by actual physical danger. Most any stressful situation, physically or mentally, puts you in a sympathetic state.
The sympathetic state is catabolic. It breaks things down. Sympathetic states are often activated through:
- Intense workouts
- Stress in daily life
- Too little sleep
- Stimulants
- Under-eating⠀
These are all necessary at certain times to achieve your goals. Stress/sympathetic states aren't bad - just be sure to take time to recover from 'em.
When you're in a parasympathetic state - Your body is in “rest and digest” mode. This is where the important factors to recovery happen. Your body is producing hormones, digesting food, absorbing nutrients, building muscle, etc.
The parasympathetic state is anabolic. It builds. So obviously, outside of the necessary sympathetic state required to stimulate muscle growth in the gym, we want to spend as much time in a parasympathetic state as possible.
Outside of managing life stressors properly, one of the best things you can do to spend more time in a sympathetic state is... you guessed it… developing your aerobic system.
As the aerobic system develops, the PNS response increases. Having higher aerobic fitness allows you to get back into a parasympathetic state quicker after training - translating to better recovery and more progress.
Now that you’re sold on some aerobic or “lower-intensity” cardio, you’ll also notice you have an even split of aerobic & anaerobic cardio programmed. In simplest terms, the aerobic work is programmed to help your recovery between sets and training sessions, the anaerobic is programmed to increase your performance during each set.
We don’t want to program too much stressful high-intensity anaerobic along with what is already a challenging training program - which is why you’re keeping it to one day of anaerobic work & one day of aerobic work.
That said, you'll see that none of the cardio is random - just like your lifting it follows very specific progressions.
Designing A Training Week (A Microcycle)
Now that you know the basic outcomes you want from your mesocycle, let’s look at the smaller scale of how to plug the proper movement patterns in on a weekly (microcycle) basis.
The Movement Hierarchy
To understand how to put together an amazing training week, you first need to shift your focus to movements instead of muscles.
I first learned of the Six Foundational Movement Patterns from John Rusin:
1. Squat
2. Hinge
3. Lunge
4. Push
5. Pull
6. Anti-movement
The idea here is training movement patterns, rather than focusing too much on training specific muscles in isolation.
By training each of these movement patterns, you end up training every major muscle group in your body.
Now achieve pain-free lean muscle & functional strength, there’s a clear hierarchy of importance within the six foundational patterns. The thing your training is probably missing, is the correct dose of each pattern - which is why I created The Movement Hierarchy.
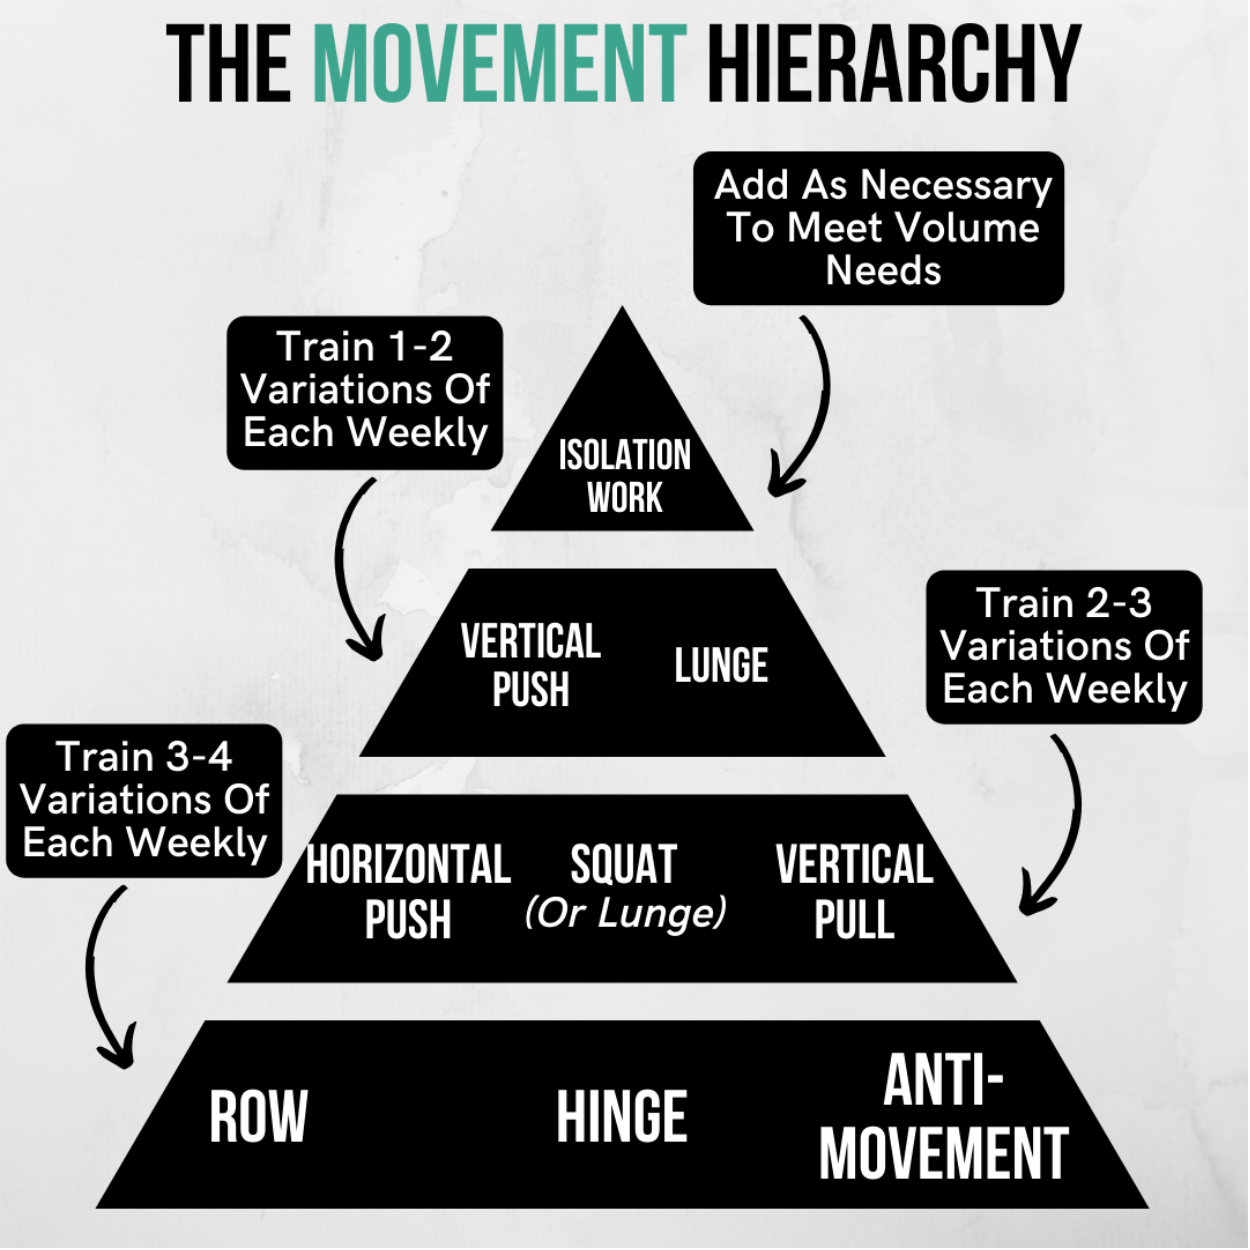
This is an incredibly useful tool to use when programming for yourself or your clients. Let’s break it down.
→ Tier One: Row | Hinge | Anti-Movement
Tier one is your most foundational movements. To achieve health and longevity in and out of the gym, you need to emphasize these most within your training.
These movement patterns (and the muscles they train) truly create the foundation for a healthy, pain-free body that’s both functionally strong and athletic.
The posterior muscles (the muscles on the backside of your body) are key stabilizers to the most frequently injured and unstable joints in your body:
- Your upper back musculature stabilizes the shoulder joints
- Your hamstrings stabilize your knees
- If your glutes are weak, you’ll compensate with your low back.
A weak posterior increases your odds of experiencing pain and potentially injury around one of these joints.
Most of us love to push (think: bench press, overhead press). Pushing trains our anterior musculature: chest, delts, quads... the fun stuff you can watch yourself train in the mirror.
But when it comes to pulling (which works the muscles on the backside of your body), those muscles are much harder to feel and see. Out of sight, out of mind.
Typical office jobs that have you sitting at a desk with a slouched forward posture makes things worse. Most of us have a pretty significant anterior > posterior muscle imbalance, which frequently shows up as low back and shoulder pain.
Now, it’s easy to train anterior > posterior muscles to the point of imbalance. But it’s very hard to achieve a posterior too strong relative to the anterior.
The Row (Horizontal Pull)
When you row, you’re primarily Training the muscles of your upper back.
A strong upper back is key to shoulder health and stability. If you’re benching a lot, you need to be rowing just as much (if not more).
Mastering the rowing movement builds a strong foundation for a healthy, pain-free upper body. This is why you’re going to be putting a STRONG emphasis on the rowing pattern in this training program, and adding in lots of extra upper back volume with movements like Band Pull-Aparts, Facepulls, Dumbbell Back Flys, etc.
Not only does this focus on your upper back change how your physique looks entirely, but your shoulders will also feel amazing.
The Hinge
The hinge movement pattern is great for your hamstrings and glutes, and often back and core.
Strong glutes are essential both in and out of the gym - when your glutes aren’t strong enough to do their job on a movement like a squat or deadlift, more of the work is forced on the surrounding areas… usually your lower back.
In general, the hinge pattern is where people most often report tweaking their lower backs. The usual culprit is either:
- You don’t know how to hinge properly.
- Your glutes are weak OR you’re not recruiting them when necessary.
Either way, it’s important to practice the skill of the hinge AND train the muscles associated with hinging to set yourself up to feel crazy strong in the gym and stay pain-free outside of the gym.
Most hinge variations are great for your whole backside - so you get a lot of bang for your buck out of this pattern. Get strong at your preferred deadlift variation, and you’ll build great glutes, hamstrings, and upper back in the process.
Anti-Movement
We all love to do tons of spinal flexion exercises: crunches, leg raises, and the like.
The thing is, when we’re training spinal flexion, we’re not effectively training our core for its essential function: resisting movement to stabilize your spine and pelvis under load.
The ability to use your core to resist movement is key to a strong deadlift, squat, and even overhead press. Very often the limiting factor keeping you from being as strong as you could be on your compound movements is the core. The inability to stabilize your spine is also a likely culprit for your low back pain.
Anti-movement encompasses anti-extension, anti-lateral flexion, and anti-rotation movements.
Now, you probably cringe when you think of doing a boring set of planks. I get it... I do, too. But as you’ll find in this training program, anti-movement training doesn’t have to be boring at all.
By putting a major emphasis on Tier One of The Movement Hierarchy, we’re helping you build a very resilient body, and setting you up for a lifetime of pain-free progress.
→ Tier Two: Squat | Horizontal Press | Vertical Pull
Tier Two primarily trains the muscles opposite your Tier One muscles.
Squat
The squat has a somewhat undeserved reputation as a glute builder. It’s really a much more quad-dominant movement for most people. For those with a quad > hamstring imbalance, this is a common cause of low-back pain, and squatting more will make the issue worse, so just make sure you’re prioritizing your posterior work.
Similar to the deadlift, you don’t have to force feed conventional barbell back squats into your training program (just do more single-leg/lunge work). Find a variation that works the best for your anatomy, injury history, and goals, and get really damn strong at it.
Horizontal Push
Everyone’s favorite: Bench Presses, Push-Ups, etc. Horizontal pushing is great for your push muscles: your chest, shoulders, and triceps.
All great things - but pushing more than you pull often leads to shoulder pain. So be sure to mind the hierarchy, and keep lots of upper back work in.
Vertical Pull
You’re training your upper back here as well, but from overhead.
These are above rows on the movement hierarchy, because many people don’t yet have the ability to move their scapulae correctly when pulling. This results in other muscles doing the work... and often shoulder pain. The rowing motion is easier to master first, and carries over to strength on the vertical pull.
Truly, most people could train only the first two tiers and get great results. If you’re a coach, this is where your clients will spend most of their time (but be sure to add in single-leg work). By mastering them, you’ll build an amazing foundation for a lean, strong body.
→ Tier Three: Vertical Push | Lunge
Lunge
When we look at your training from a “functional” viewpoint, the ability to do things with one leg at a time is very important.
The squat and hinge are great movements. But, when training with both legs at the same time (bilaterally), often one leg will be doing more of the work than the other, without you realizing it.
This compounds over time to form imbalances, and potential pain and injury.
On the same note, if you have back issues, training the lower body hard enough to create an effective training stimulus becomes a challenge.
This is where unilateral (single-leg) work like lunges is a game-changer. It allows you to load the legs super heavy, while also drastically reducing the amount of stress that you put on the spine.
For example:
Say you can’t progress past 225×6 on your back squat without tweaking your low back.
You decide to load up the split squat movement heavy and find that you can rep out 70lb dumbbells in each hand for 6, without back pain.
When you squat 225, you’re basically hitting each leg with ~112.5lbs. With split squats, you’re hitting each leg with 140lbs, but with much less stress on your back. It’s a win-win. Unilateral movements allow you to create a GREAT training effect for the lower body, without loading the spine to the degree necessary with bilateral squat variations.
Really, I would consider unilateral/lunge work as interchangeable with you squat movement pattern.
From real-world experience training hundreds of clients in-person and online, the lunge variations (e.g. Bulgarian splits squats, reverse lunges) will often make as much or more sense for your goals and lifestyle than bilateral squats.
So if you have back issues, you’re OK to plug a single leg movement in for the squat pattern in this program. The only reason the squat is lower on The Movement Hierarchy is. If you can’t squat on two legs, you’re screwed on one.
Vertical Push
Pressing overhead incredible for building strong shoulders that look great.
That said, realize that you’re already hitting your shoulders with quite a bit of volume training your horizontal presses. So adding in too many more sets of horizontal presses will leave your shoulders feeling beat up, and quickly.
Plus, we just don’t do things overhead much in our day-to-day life. So if you haven’t been training properly, you’ll likely be lacking the mobility you need to get overhead. This means that most people will do well with a limited amount of overhead pressing (relative to the first two tiers).
You’ll get 90%+ of the results sticking in Tiers 1-3 - these should always be the primary focus of your training.
→ Tier Four: Isolation Work
I’m not going to go too in-depth here, as I really address this in the Finishers section below. But essentially, isolation work is just a useful tool to bring up weak points, or and more volume to muscles you want to focus on.
One of my favorite things about this program is, you have multiple options to choose from to build your specific weak points (e.g. upper back, hamstrings, glutes), as well as focusing on your vanity muscles like biceps - which is important! Remember, having fun is a HUGE part of long-term success with your training.
Designing A Training Day
Ok, you know how to put together a solid month of training, and each week within that month. Now it’s time to educate you on how to build the perfect training day within each week.
Building The Perfect Training Day: My 5 Phase System
There are FIVE PRINCIPLES I design all my online client's individual programs around.These principles allow you tons of customization with your training, while also ensuring that your program is based on a solid foundation that WILL get you results.
Every training day in the programs is built around this 5 phase system.
The principles can each be seen as distinct phases. Each phase has a very specific focus, but they’re all pushing you towards the same overarching goal.
Since this is essentially the definition of periodization, think of these 5 phases as a periodization system within your training day.
I truly believe this is the most effective way to train for anyone who wants to look better, feel better, and move better.
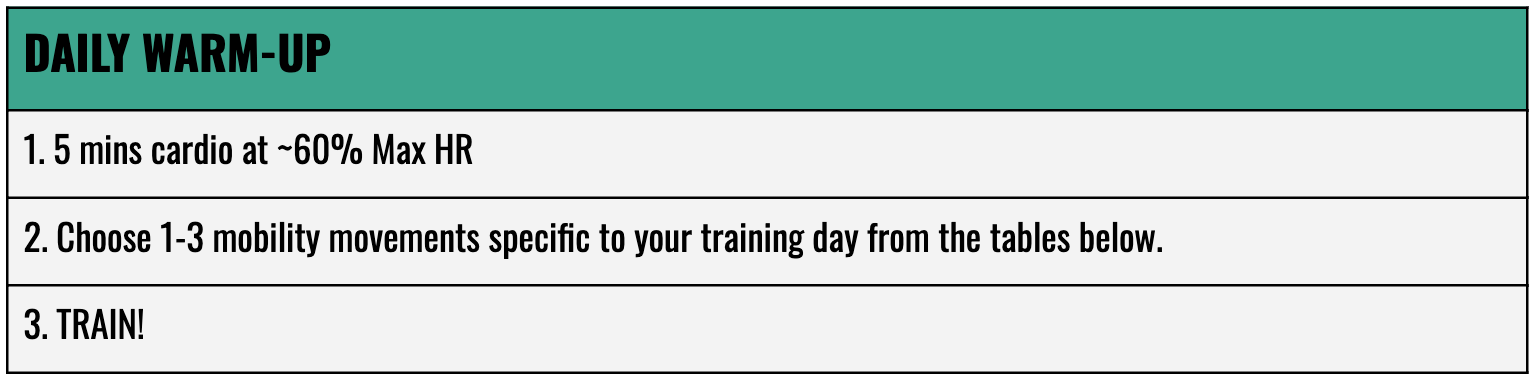
Phase One: Mobilize
→ Goal - Prep the joints and muscles you'll be training for movement through their full ranges of motion.
If you’ve been sitting at your desk all day, your body isn't ready to get under a barbell for an ass-to-grass squats.You need to prep your joints and muscles for movement before adding load.
If you skip this phase, you're increasing the odds you'll get injured.
Now don’t worry, you don’t need to turn into “the mobility guy/girl” - we’re making this as quick and efficient as possible.
Prescription - You’ll be doing at least one dynamic mobility movement to address the joint(s) and muscles you’ll using for your first strength movement of the day. Choose an option corresponding to your first strength movement of the day. (E.g. if deadlifting, choose a hinge pattern.)
Optionally, add 1-2 more movements addressing specific weaknesses relevant to today’s training. (E.g. if your ankle mobility is an issue, and you’re squatting today, choose an ankle mobility movement to pair with the bear squat.)
If you don't have any movement restrictions, you're welcome to do the prescribed movement pattern for your first strength movement, and move on.


Phase Two: Prime
→ Goal - Activate the necessary muscles to fire optimally, and prep the central nervous system for explosive movement.
The priming phase allows you to fully recruit the necessary muscles when called upon. It also primes your CNS to be explosive, improving performance in the strength portion of your training session.
Again, this is dependent on your first strength movement of the day. Your primer phase will always consist of:
1. Posterior chain exercise(s) - The muscles on the back side of the body play a key role in stabilizing the most injury prone joints - the knees, shoulders, and spine.
These are also the muscles we have the hardest time feeling/recruiting, so activating the posterior is a must for both muscle growth and injury prevention.
- Upper back - The upper back muscles stabilize the (very unstable) shoulder joint. Upper back activation work before a heavy push movement means less stress on the shoulders and lower odds of injury. The upper back also plays a key role in movements like the deadlift (lats help keep the spine rigid) and front squats (upper back keeps the bar in place), so always include at least one upper back exercise in the priming phase.
- Hamstrings & Glutes - The hamstrings are key to stabilizing the knees. The glutes are key to protecting the spine. Again, these muscles are typically under-active. If you go into a heavy deadlift without first activating your glutes and hamstrings, the work will be distributed somewhere else (usually your lower back).
2. Core Activation - The core stabilizes the spine. Being able to activate and brace the core when under a heavy load with movements like squats and deadlifts is crucial. You're mimicking what your core will be doing during the workout.
3. Explosive movement - Here, you're preparing your central nervous system to lift explosively when we start the training portion of the workout. You’ll always be performing a movement pattern that corresponds with your first strength movement of the day in an explosive fashion. We DON’T want to create fatigue here, but a few explosive reps that mimic the first strength movement mean your CNS will be firing on all cylinders when you get under the barbell.
Phase Three: Metric-Based Movements
→ Goal - Stimulate maximal strength and muscle gain by pushing heavy weight on the compound lifts.
Now that your body is fully mobilized and primed, you're going to start the most challenging part of the workout right out of the gate.
Basically, this is the part of the training program where we get you strong as hell, and build some lean muscle to boot.
You're lifting heavy weight (while maintaining quality form), and pushing for frequent weight increases. The objective here is applying the principle of progressive overload.
Progressive overload: The gradual increase of stress placed on the body during training - basically, you need to find a way to do a bit more in the gym over time to keep changing your body.
Now, as you’ll learn about soon, you have progressive overload built in to this program - all you have to do is follow it as it’s laid out, and you’ll see great progress!
In this phase, you're focused on either adding weight or adding reps to 1-2 compound movements (the first three tiers of The Movement Hierarchy).
You're focusing on these first because:
- You're working many different muscle groups simultaneously - This makes the compound movements, GREAT for building muscle and strength, but also very fatiguing - so they should start off your workout.
- Mechanical tension - Muscle growth comes from three primary mechanisms:
→ Mechanical tension: Created by lifting heavy-ass weight. By progressively increasing the amount of tension you put on a muscle, you force growth.→ Metabolic stress: The burning feeling you get when you do a high-rep set of curls. Metabolites are accumulating in your muscle cells, leading to cell swelling, hormonal changes, and a variety of other factors that are thought to influence muscle growth.→ Muscle damage: Adequate training stress >> muscle damage (often experienced as soreness) >> recovery >> growth
Out of these three factors, mechanical tension is thought to be the most important.
Compound movements allow you to lift much more weight than isolation movements. This means you create a lot more tension with compound movements, and therefore build more muscle.
→ Goal - Send a strong hypertrophy signal to the body to stimulate dense muscle growth.
This phase is all about sparking new muscle growth (a.k.a hypertrophy).
Similar to the strength phase, you're going to be utilizing compound movements here. That said, your mindset with this phase is much different. The first phase was designed to get you feeling strong. This phase could be best described as "functional bodybuilding".
You'll be training in more moderate rep ranges (typically 6-15). While we can build lean muscle in a broad rep range, 6-15 tends to be the most efficient.
Now, this is the functional bodybuilding part of your program, because you’re training the functional foundational movement patterns like an athlete would:
1. Squat
2. Hinge
3. Lunge
4. Push
5. Pull
...but really focusing on connecting to the muscles working within these patterns, like a bodybuilder would. Weight is important, but if you can’t feel the desired muscle working at all, you’re probably not generating as much tension in said muscle as we need for you to progress.
Phase Five: Finishers
→ Goal - Finish your training day with an intense, goal-specific burn.
These are just straight up fun - intense, but fun. Within this program you’ll be running finishers that vary from skin-splitting pumps, to pushing your core strength to new heights, to jacking your heart rate up and testing the limits of your conditioning.
Just like your program as a whole, your finishers implement tons of different methods and modalities to ultimately help you achieve a lean, strong, and athletic physique.
You have multiple options built in for finishers, depending on your weak body parts & goals.
To learn all about how I program finishers for online clients, check out this blog.

And that, ladies & gentlemen, is how I've built you the perfect 12 week training program inside of my membership coaching program.
I'm going to be releasing this program SOON. (Dependent on COVID-19).
When the doors open, I'm limiting the amount of people who can join the 12-week program.
And once the spots fill up, this program will NOT be available again.
→ This is a 12-week periodized training program run by me, through the True Coach software I use with all my 1-1 clients.
→ You'll have a choice between an Upper/Lower functional bodybuilding program -OR- a full body strength/fat loss program.
→ Both programs are designed to transform your physique, build functional strength & lean muscle, and push your energy systems to new heights.
→ On top of that, you'll have access to myself in a private community for accountability & support. We're here to answer any questions you have about the programs, your nutrition, etc.
Again, spots are limited. Drop your email below to hop on the waitlist, and among the first notified when the program opens ↴
Keep Learning

Food Quality Vs. If It Fits Your MacrosProject type

How To Set (And Adjust) Your Macros For Any GoalProject type


The Glute Growth Blueprint [Feat. Alex Bush]Project type


The Ultimate Guide To Flexible DietingProject type


The Fat Loss GuideProject type

How To Fix Stalled Fat LossProject type


The Best Diet To Lose Weight Postpartum - backupProject type


How To End A Diet (Without Losing Your Results)Project type


The Best Diet To Lose Weight PostpartumProject type

The 5 Keys To Maintaining Weight Loss ForeverProject type


How To Use Nutrition Periodization For Fat LossProject type

5 Ways To Get (and stay) MotivatedProject type

The Best Exercises For Building GlutesProject type

How To Hit Your Macros While TravelingProject type

The 6 Keys To Building Muscle For WomenProject type

Mom Of Five Photoshoot Prep (Nutrition Protocol, Training Strategy, Macro Adjustments, And More)Project type

Why Your Macros Aren't Working For Fat LossProject type

The Best Nutrition Strategy For Building MuscleProject type


Should You Bulk Or Cut First?Project type

Mom Of Five Photoshoot Prep (Nutrition Protocol, Training Strategy, Macro Adjustments, And More) - backupProject type


How To Sleep For Muscle Growth & Fat LossProject type


The Stubborn Muscle Solution For Your Delts, Quads, Hamstrings, and Back (Finally See Growth!)Project type


[GUIDE] The Best Diet To Get Lean In 12 WeeksProject type

Thyroid Health 101Project type

How To Change Your Body Fat Set PointProject type


The Core Training BlueprintProject type

How To Minimize Hunger On A DietProject type

Do You Need To Reverse Diet? [When/Why/How]Project type

The Ultimate Guide To PowerbuildingProject type

[GUIDE] How To Do Your First Pull-UpProject type

Building The Female PhysiqueProject type


Nutrition For Aesthetics [Beyond The Basics]Project type


The Definitive Guide To Periodizing NutritionProject type

The Ultimate Mini Cut Guide [Rapid Fat Loss]Project type

[Peak Week Guide] How To Get Photoshoot ReadyProject type


The Rapid Fat Loss ProtocolProject type


The 6 Worst Nutrition Mistakes You're MakingProject type

The Shoulder Training BlueprintProject type


Diet Breaks 101 (What/Why/How)Project type


CALORIE CYCLING 101: 6 Methods To Get You LeanerProject type

HORMONES: Are They Killing Your Results?Project type

The Complete Guide To Getting Visible AbsProject type

The P3 Fat Loss MethodProject type


How To Fix Your Gut Health & DigestionProject type


[Client Case Study] Achieving Lifestyle LeanProject type


How To Find Your Ideal DietProject type

Is Insulin Making You Fat?Project type

Why Fat Loss Stalls [And What To Do]Project type

The Complete Guide To Training At HomeProject type


The Body Composition Change BlueprintProject type

The 6 Most Helpful Things I've Learned In The Last Year [Training, Nutrition, & Coaching]Project type

[Program Design Masterclass] The Full Body SplitProject type


[GUIDE] How To Avoid Holiday Fat GainProject type

Do You Need To Reverse Diet?Project type


How To Stay Lean While Traveling/On VacationProject type


Client Case Study: 6 Months To Photoshoot LeanProject type

[GUIDE] Beat The Skinny-Fat PhysiqueProject type


[10 TIPS] How To Stay Lean For LifeProject type

[KEY TO CLIENT SUCCESS] The Motivation ManualProject type

[GUIDE] The Core Training BlueprintProject type


Fat Loss For Women: The Complete GuideProject type


How To Get Bigger ArmsProject type


Strategies To Make Dieting Suck LessProject type

Dealing With Fat Loss StallsProject type

Compound Exercises vs. Isolation ExercisesProject type

Are Any Supplements Worth The Cost?Project type

7 Diet & Nutrition Tips For Fitness And HealthProject type

Is The Fitness Industry Full of Lies?Project type
The Lean Gains BlueprintProject type


My 3 Favorite Movements For Each Muscle GroupProject type

Can You Grow Your Calves or Is It All Genetics?Project type

The BEST Diet For Rapid Weight LossProject type

Does Eating Red Meat Cause Cancer?Project type

EVERYTHING You've Heard About Fat Loss Is A LIE.Project type

Is It Harder For Women To Get Abs?Project type

How To Get Toned ArmsProject type


How Often Should I Go To The Gym?Project type

How To Prioritize Cardio Vs. WeightliftingProject type


Does Gut Health Effect Weight Loss?Project type

Are Group Fitness Classes Effective?Project type

A Beginner's Guide To Intermittent FastingProject type


Can't Do A Chin-Up? Do This FirstProject type

Best Exercises For Defined ShouldersProject type

Fix Your Back PainProject type


Why can't I gain more muscleProject type

How to build great bicepsProject type

How to get AbsProject type


How to end a diet (without losing your results)Project type


The Best Diet To Lose Weight PostpartumProject type

The 5 Keys To Maintaining Weight Loss ForeverProject type


