

Building stronger glutes is a necessity for not only an aesthetic physique, but for a more powerful, fast, and athletic body.
The problem?
Most glute workouts focus only on the "bridging" and "pumping" movements. That’s because doing a lot of those exercises will make you feel the burn... but don’t be fooled into thinking that means it’s a great workout.
You need to create overload over time, and get enough volume to create a change. A bunch of donkey kickbacks and lying leg lifts may feel hard... but you won’t be able to add much resistance over time.
In this blog, you'll learn the smartest way to train to finally build the glutes you've always wanted.
Key Terms You Need To Know For Better Glutes
Before we dive into how to program for better glutes, let’s define some terms you'll see in this blog. Knowing these will help you understand how and why we program the way we do for online clients.
Key Term #1: Progressive Overload: In order to make progress, you’ll need to make sure you are incorporating progressive overload. Progressive overload means you’re working harder over time. You can use a variety of different methods to overload.
You can make your training harder by:
- Adding weight
- Adding reps
- Adding sets
- Increasing time under tension
- Increasing range of motion
- Decreasing rest time
- Improving form
- Lifting the weight faster
Key Term #2: Volume: Volume is sets x reps x weight.
For example:
If you lift 50 pounds for 2 sets of 10 reps, your volume for that exercise on that day is 1000 pounds.
When you hear something referred to as a “high volume” exercise or set, it’s usually in a rep range of 8-12, which used to be classified as a hypertrophy (muscle growth) rep range. That’s because the reps are low enough you can use a good amount of weight, but not so low that you don’t accumulate a lot of volume on the set.
Key Term #3: Intensity: Intensity refers to how heavy a set is. A high intensity lift is usually very low reps, but very high weight, relative to your strength.
Glute Anatomy & Function
Before you can build a great backside, you need a basic understanding of the different muscle groups of your glutes, and how they work.
The glutes are a group of 3 muscles: the gluteus maximus, gluteus medius, and gluteus minimus.
Here's how they work.
1. Gluteus Maximimus (Glute Max):
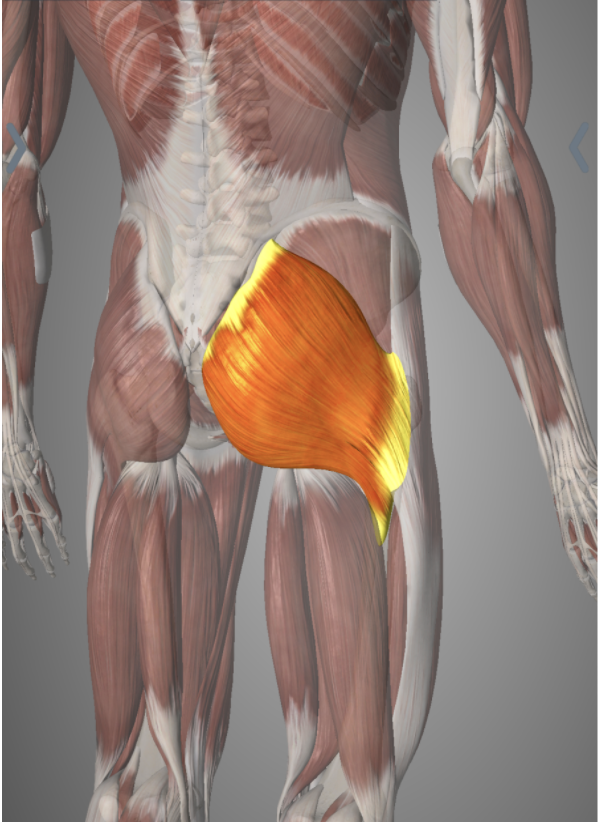
The gluteus maximus is the largest glute muscle, hence the name.
The glute max works to rotate your hip outward (external rotation), and thrust your hips forward (extension.)
Think about your hips in a squat or deadlift.
You’re "corkscrewing" your feet into the floor, which is external rotation, and you’re thrusting your hips forward at the top. Both of these movements are the work of the gluteus maximus.
2. Gluteus Medius (Glute Med):

Next up is the gluteus medius, the second largest glute muscle.
This muscle is located on the side of your hip, and is responsible for moving your leg out away from your body.
If you can imagine doing a Side Lying Clamshell (essentially lying on your side, and raising your top leg towards the ceiling - this movement is called abduction), your glute med is the muscle doing most of the work.
Along with abduction, your glute med also twists your your leg inward.
3. Gluteus Minimus (Glute Min):

The gluteus minimus is the smallest glute muscle and sits underneath the medius.
Like the medius, it’s job is to internally rotate your leg (twist your leg inward).
That said, even though the glute med is the smallest glute muscle, it still needs to be trained properly in order to build great glutes.
In order to glutes that both look great and keep you functionally strong and injury-free, you need to ensure you're train all of the muscles of your glutes properly.
Why Proper Glute Training Is Key For Function + Aesthetics
The glutes are an important group of muscles. They have a role in walking, running, climbing stairs, squatting, hinging, and balance.
When you look at an athlete, one of the main aesthetic giveaways is strong looking glutes. That’s because a strong set of glute muscles means you have more power and speed.
The opposite is also true.
Weak glutes can mean more injuries, less power, and poor posture.
One side effect of weak glutes is an "anterior pelvic tilt" or "lower cross syndrome". This is often caused by excessive sitting which weakens glutes and shortens hip flexors, and is worsened by a weak core and tight lower back.
Anterior pelvic tilt can make it harder to feel and activate your glutes in exercises, which then exacerbates the pelvic tilt, and thus becomes a vicious cycle of pancake butt and back pain.
To get out of this downward spiral of poor posture and glute weakness, you need to learn to "feel" your glutes before moving on to larger movements like the squat or deadlift.
Let dive into smart exercises to encourage proper alignment and glute activation before training.

Priming Your Glutes For Growth
The first thing most online client do before priming the glutes, is stretch the hip flexors.
The hip flexor muscles are an antagonist (a muscle that contracts while another relaxes) to the glutes (in this case, hip flexors relax as glutes contract), and can get shortened and tight if you're spending too long in a sitting position. Stretching them out first can allow you a better range of motion without over-arching your back during your glute work.
A half kneeling hip flexor stretch for 2-3 sets of 3-5 reps per side works really well here:

Once you have your hip flexors stretched and are able to get a good glute contraction without hyperextending (think: arching) your lower back, then you can move on to priming movements. These get your glutes firing and ready for the main workout.
Priming Movement #1: The Glute Bridge - 2-4 Sets x 15-25 Reps
The bridge is focused mainly on the gluteus maximus. In this exercise you’ll start by laying flat on the floor and pressing your low back down into the floor.
This will posteriorly tilt your pelvis (as we've talked about, this allows for better glute contractions), and activate your core, which will keep your pelvis stable.
You’ll then bridge your hips up, squeezing your glute muscles hard at the top of the bridge.
Priming Movement #2: Band Monster Walks - 2-4 Sets x 10-20 Reps/Side
This exercise activates and warms up your gluteus medius for abduction.
For the monster walk you’ll put a mini-band around your ankles or knees, and walk side to side.
Drive off of your plant foot, and focus on keeping constant tension on your glutes throughout.
Priming Movement #3: Band Pallof Press - 2-4 Sets x 8-12 Reps/Side
The final activation exercise we usually program for online clients before glute-focused work is actually a core exercise.
This will activate your TVA (transverse abdominis) and oblique muscles which, if you remember from the anterior pelvic tilt explanation, is are two of the muscle groups responsible for posture and effective glute training.
Science-Based Training For Better Glutes
Now that you’ve sufficiently primed your glutes and can feel them working, it's time to actually start training them for growth. If you’re doing a training program with a full body or upper/lower split, you'll be working much more than just your glutes in your training session. That means you need to know how to program them into your split.
To do that you need to know the different types of glute exercises.
You can divide your glute-developing movement patterns into 4 categories:
1. Hinge
2. Bridge
3. Squat
4. Abduct

To adequately work the glutes in each plane of movement you need to include each of these four movement patterns across your training week.
So, to put this all together in a sample training program...
Let’s say you came to us for coaching and want a program designed for you. After going through a detailed call and questionnaire we determine your goal is aesthetics, and you especially want to focus on growing your glutes.
You have four days a week to train, so we will give you an upper/lower split, but with the main focus of growing glutes we give you some extra glute work on your upper body days as well.
A full week’s training might look like this:
Day 1: Monday - Lower Body
Lower body primer, 2 rounds:
- Spiderman lunge w/ rotation x5 each side
- Banded Hip Thrust x15
- Side Plank Rotation x8/side
- Explosive KB Swing x8
a1.) Sumo Deadlifts 4×5. 3 RIR. 2 minutes rest.
b1.) Goblet Squat 3x10. 3 RIR. 2 minutes rest.
c1.) Step back lunges 3×10 1 RIR. 2 minutes rest.
d1.) Clamshells 3 x 25 each way 1 RIR. 1 minute rest
d2.) Leg Extensions 3x15. 1 RIR. 1 minute rest.
Day 2: Tuesday - Upper Body
Upper body primer, 2 rounds:
-Cable Face Pull x10
-Cable Pallof Press x8/side
-Bent Over Chest Throw x5
a1.) Bench Press 4x8. 3 RIR. 2 minutes rest.
b1.) Barbell Row. 4x8. 3 RIR. 2 minutes rest.
c1.) Dumbbell Overhead Press. 4x12. 3 RIR. 2 minutes rest.
d1.) 1 arm Dumbbell Row. 3x12 each. 3 RIR. 1 minute rest.
e1.) Glute focus back extensions 3x15. 1 RIR. 30 seconds rest.
e1.) Monster walks 3x30. 1 RIR. 30 seconds rest.
Day 3: Thursday - Lower Body
Lower body primer, 2 rounds:
- 1-Leg Bridge x10/side
- ½ Kneeling Cable Row x8/side
- Side Plank + Reach 3x5/side
a1.) Low bar squat 4×8. 3 RIR. 2 minutes rest.
b1.) Barbell hip thrust 4×8-10. 3 RIR. 2 minutes rest.
c1.) Bulgarian Split Squat 4x8 each side. 3 RIR. 2 minutes rest.
d1.) Cable kick backs 3x15 each side. 1 RIR. 30 seconds rest.
d2.) Frog pumps 3x30. 1 RIR. 30 seconds rest.
Day 4: Friday - Upper Body
Upper body primer, 2 rounds:
-Feet Elevated Glute Bridge x15
-Band Resisted Dead Bug x 8/side
-Banded Wall Slides x3
a1.) Barbell Z-Press 4x8. 3 RIR. 2 minutes rest.
b1.) T-Bar Row 4x10. 3 RIR. 2 minutes rest.
c1.) ½ Kneeling Dumbbell Shoulder Press 3x10 each side. 3 RIR. 1 minute rest.
d1.) Meadows Row 3x10 each side. 1 RIR. 1 minute rest.
e1.) Cable Pull Through 3x12. 1 RIR. 30 seconds rest.
e2.) Kettlebell Swings 3x15. 1 RIR. 30 seconds rest.
e3.) Seated Abductions 3x30. 1 RIR. 30 seconds rest.
In your training program, you've worked each movement pattern in a variety of rep ranges across the week. There are high volume/low intensity exercises, as well as high intensity/low volume exercises.
- Higher volume exercises are things like the step back lunges where you’re getting 20 total reps, and you are lifting for high enough reps that you’re shaky and tired after the set.
- High intensity exercises are things like the sumo deadlifts, where you’re lifting very heavy for each rep, but only lifting 4 reps per set. Including both in your training program will help you build strength and grow the muscles.
What I recommend for overload in this program, is decreasing RIR each week. (RIR stands for Reps In Reserve - this means the reps you have left in the tank after your set.)
Let’s say you’re doing a set of squats and your all-out-failure point with 115 pounds would be at 12 reps. That means if your workout calls for a 2 RIR, you’ll use 115 pounds and do 10 reps.
Most of the big compound movements in this program have a 3 RIR listed. As a client, you would start Week 1 by doing 3 RIR, before adding either weight of reps to progress to a 2 RIR in Week 2. Week 3, you repeat the process by increasing reps or weight again to progress to a 1 RIR.
And that’s how you grow strong and powerful glutes. Prep for the movement first, then use the correct frequency and intensity for each type of movement, and train your glutes in each different movement pattern.
Need a fully customized training + nutrition plan and expert coaching through the process of building your best body composition ever? Click here now to apply for online coaching with our team.

About The Author
Andrea Rogers is a certified nutrition coach, personal trainer, and coach for BairFit. Follow her on Instagram for more helpful training + nutrition content.
Keep Learning

Food Quality Vs. If It Fits Your MacrosProject type

How To Set (And Adjust) Your Macros For Any GoalProject type


The Glute Growth Blueprint [Feat. Alex Bush]Project type


The Ultimate Guide To Flexible DietingProject type


The Fat Loss GuideProject type

How To Fix Stalled Fat LossProject type


The Best Diet To Lose Weight Postpartum - backupProject type


How To End A Diet (Without Losing Your Results)Project type


The Best Diet To Lose Weight PostpartumProject type

The 5 Keys To Maintaining Weight Loss ForeverProject type


How To Use Nutrition Periodization For Fat LossProject type

5 Ways To Get (and stay) MotivatedProject type

The Best Exercises For Building GlutesProject type

How To Hit Your Macros While TravelingProject type

The 6 Keys To Building Muscle For WomenProject type

Mom Of Five Photoshoot Prep (Nutrition Protocol, Training Strategy, Macro Adjustments, And More)Project type

Why Your Macros Aren't Working For Fat LossProject type

The Best Nutrition Strategy For Building MuscleProject type


Should You Bulk Or Cut First?Project type

Mom Of Five Photoshoot Prep (Nutrition Protocol, Training Strategy, Macro Adjustments, And More) - backupProject type


How To Sleep For Muscle Growth & Fat LossProject type


The Stubborn Muscle Solution For Your Delts, Quads, Hamstrings, and Back (Finally See Growth!)Project type


[GUIDE] The Best Diet To Get Lean In 12 WeeksProject type

Thyroid Health 101Project type

How To Change Your Body Fat Set PointProject type


The Core Training BlueprintProject type

How To Minimize Hunger On A DietProject type

Do You Need To Reverse Diet? [When/Why/How]Project type

The Ultimate Guide To PowerbuildingProject type

[GUIDE] How To Do Your First Pull-UpProject type

Building The Female PhysiqueProject type


Nutrition For Aesthetics [Beyond The Basics]Project type


The Definitive Guide To Periodizing NutritionProject type

The Ultimate Mini Cut Guide [Rapid Fat Loss]Project type

[Peak Week Guide] How To Get Photoshoot ReadyProject type


The Rapid Fat Loss ProtocolProject type


The 6 Worst Nutrition Mistakes You're MakingProject type

The Shoulder Training BlueprintProject type


Diet Breaks 101 (What/Why/How)Project type


CALORIE CYCLING 101: 6 Methods To Get You LeanerProject type

HORMONES: Are They Killing Your Results?Project type

The Complete Guide To Getting Visible AbsProject type

The P3 Fat Loss MethodProject type


How To Fix Your Gut Health & DigestionProject type


[Client Case Study] Achieving Lifestyle LeanProject type


How To Find Your Ideal DietProject type

Is Insulin Making You Fat?Project type


Why Fat Loss Stalls [And What To Do]Project type

The Complete Guide To Training At HomeProject type


The Body Composition Change BlueprintProject type

The 6 Most Helpful Things I've Learned In The Last Year [Training, Nutrition, & Coaching]Project type

[Program Design Masterclass] The Full Body SplitProject type


[GUIDE] How To Avoid Holiday Fat GainProject type

Do You Need To Reverse Diet?Project type


How To Stay Lean While Traveling/On VacationProject type


Client Case Study: 6 Months To Photoshoot LeanProject type

[GUIDE] Beat The Skinny-Fat PhysiqueProject type


[10 TIPS] How To Stay Lean For LifeProject type

[KEY TO CLIENT SUCCESS] The Motivation ManualProject type

[GUIDE] The Core Training BlueprintProject type


Fat Loss For Women: The Complete GuideProject type


How To Get Bigger ArmsProject type


Strategies To Make Dieting Suck LessProject type

Dealing With Fat Loss StallsProject type

Compound Exercises vs. Isolation ExercisesProject type

Are Any Supplements Worth The Cost?Project type

7 Diet & Nutrition Tips For Fitness And HealthProject type

Is The Fitness Industry Full of Lies?Project type
The Lean Gains BlueprintProject type


My 3 Favorite Movements For Each Muscle GroupProject type

Can You Grow Your Calves or Is It All Genetics?Project type

The BEST Diet For Rapid Weight LossProject type

Does Eating Red Meat Cause Cancer?Project type

EVERYTHING You've Heard About Fat Loss Is A LIE.Project type

Is It Harder For Women To Get Abs?Project type

How To Get Toned ArmsProject type


How Often Should I Go To The Gym?Project type

How To Prioritize Cardio Vs. WeightliftingProject type


Does Gut Health Effect Weight Loss?Project type

Are Group Fitness Classes Effective?Project type

A Beginner's Guide To Intermittent FastingProject type


Can't Do A Chin-Up? Do This FirstProject type

Best Exercises For Defined ShouldersProject type

Fix Your Back PainProject type


Why can't I gain more muscleProject type

How to build great bicepsProject type

How to get AbsProject type


How to end a diet (without losing your results)Project type


The Best Diet To Lose Weight PostpartumProject type

The 5 Keys To Maintaining Weight Loss ForeverProject type


